
Topics
- Device Tech
- Ghost Box Hack
- ITC Tech
- KII Meter Tech
- Orb Tech
- Deception
- Dimensional Shift
- Matrixing
- Schematics
- Investigations
- Downloads
- Investigation Tips


Dimensional Shift
|
Digital cameras have advanced a great deal
since I started this page over 5 years ago. Back in 2001 the latest digital camera boasted about 2.0
megapixles and held about 64 megabytes of pictures, today we are up to 12+ megapixles with 2+ gigs of
space in just a short amount of time. Though they have advanced in clarity and storage capacity,
digital cameras are still plagued by a commonly overlooked problem... Dealing with light! |
Unlike the average film camera, digital cameras incorporate an electronic brain inside which is used to capture what is in front of it. When this brain is in auto mode you are giving it complete control over the exposure time, apature setting, focus and other similar functions. Unfortunately, the auto setting is causing a whole new incident of unexplained anomolies which seems to have become known as "Dimensional Shift".
Over exposing a picture is a technique that is as old as flim cameras themselves. This technique can yield some interesting results and make for some great photography if you know what you are doing. Simply put, over exposing is holding the shutter open longer then normal to allow more light to enter the film chamber. This process effects the entire picture at once, unfortunately, this does not hold true for digital cameras which can "interpret" if they have enough light or not and not allow more to some parts of the picture but expose other parts to more light which can cause a blurred image or "Dimensional" effect.
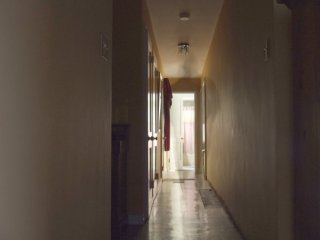
The picture at the top of this page was taken with a Fuji S5200 camera with a 3 second shutter. I put it on a 10 second timer and started the timing process and slipped into the hallway to the left while I counted to 10. Once the picture started processing, I stepped into the frame and started walking away from the camera and this picture was the result. As you can see, the darker parts of the hallway picked up more of my shadow then the lighter parts. The camera was pretty much done processing the lighter parts but thought the darker parts could stand a little more light, so it continued to process those areas. In auto mode, the camera may make a decision like this on its own, if it does not think it has enough light, it may continue to process different areas of the picture for a longer period of time then what you are expecting, even when the flash is one.
My son barrowed my old 3.2 megapixle Sony camera for a field trip to Philidelphia and came back with some intersting pictures. The words "Point and Shoot" make up how my son was taking pictures that day. Since he was pretty much in a rush the entire day, his method was to look through the viewfinder, push the shutter button, then move on, never checking the picture to see what it looked like. Apperently the camera was still processing a split second more then normal due to the lighting conditions, everything the flash illuminated showed up crystal clear but the processor was still scanning the darker parts at the top of the picture when he pulled the camera away from his face. That split second caused the smear at the top. |
|

|
The picture to the left is a deliberate example of the "Dimensional Shift" effect. This picture was taken without the flash with the camera in auto mode. The camera will process the picture a few miliseconds longer then normal to attempt to allow enough light in to get a good picture. Even those with the steadiest of hands will get some kind of ghosting/smearing effect when the shutter is open longer then normal. Not only will you move the camera just slightly, but your human subjects will most likely move a little to. |

The best method for solving this problem is to read the manual that comes with your camera and learn how to use the manual settings. Understanding how the camera works and what its quarks are can help you understand when the camera is doing things it shouldn't be doing and stop false anomolies from happeneing. Since we mostly work in low light settings during investigations, getting your camera setup properly will yield excellent picture results and you can document what the settings are which can help authenticate anomolies you do catch.
One of the things we as paranormal investigators needs to keep in mind is that the devices we are using for our investigations are not specifically designed for this purpose. To date, I do not know of any device that has proven to be an effective means of capturing proof of spirits though there are some great theories out there.